In this article, I want to shed some light on not so common configuration of the Nokia network equipment. You may encounter some situations, in which you would want to have pure layer 2 connectivity between two devices, that are within one subnet. Such scenarios aren’t a problem if you have a Cisco switch in between them. It gets more complicated if one of the devices is connected to Nokia equipment. I’ve prepared a scenario with multiple host devices that are connected to the multivendor network so you can see the difference between the configuration process of each. In this example, I’m using Nokia VSR virtual machine, but a similar config also works on physical Nokia devices. I’ve tested similar scenarios on Nokia 7750 Service router and 7210 SAs switch.
Topology
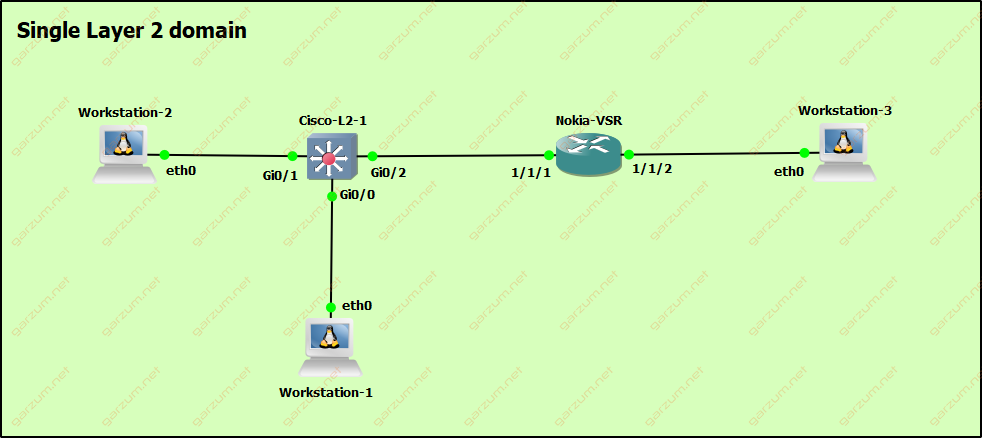
In this scenario, there are three docker Linux containers with IP addresses within one subnet.
- Workstation-1 : 192.168.0.10
- Workstation-2 : 192.168.0.20
- Workstation-3 : 192.168.0.30
Workstation-1 and Workstation-2 are connected to the Cisco-L2-1 switch. Both containers are placed in the VLAN 10. Cisco-L2-1 is directly connected to the Nokia-VSR. The connection between both network devices is configured as a trunk with only VLAN 10 allowed. Workstation-3 is attached directly to the Nokia-VSR router.
Configuration
Cisco-L2-1
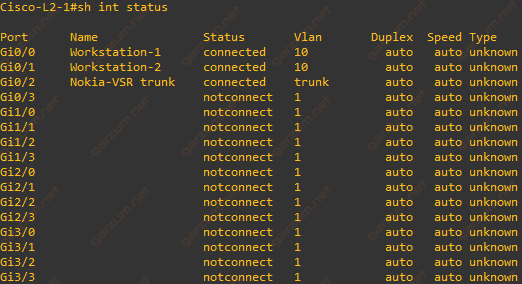
First, let’s take a look at the configuration of the Cisco-L2-1 switch. Docker containers are connected to the interfaces G0/0 and G0/1. Both ports are configured as access ports with VLAN 10.
interface GigabitEthernet0/0
 description Workstation-1
 switchport access vlan 10
 switchport mode access
 media-type rj45
 negotiation auto
!
interface GigabitEthernet0/1
 description Workstation-2
 switchport access vlan 10
 switchport mode access
 media-type rj45
 negotiation auto
!
Interface G0/2, that is connected to the Nokia-VSR is configured as a trunk interface, with only VLAN 10 allowed.
interface GigabitEthernet0/2
 description Nokia-VSR trunk
 switchport trunk allowed vlan 10
 switchport trunk encapsulation dot1q
 switchport mode trunk
 media-type rj45
 negotiation auto
!
Keep in mind, that on the newer Cisco switches, there is no need to use switchport trunk encapsulation dot1q command, because those switches are supporting only dot1q encapsulation.
Interface status can be displayed by issuing show interface status command.
Nokia-VSR
The configuration of the Nokia-VSR router will be split into two parts. First, we will configure physical interfaces, then we will move to the service configuration.
Port configuration
Before attempting to configure physical interfaces, remember to provision card and MDA. If you don’t know how to do that, make sure to read this article.
To make everything work as expected, we have to make some changes to the interface configurations. Down below you can find the configuration of port 1/1/1, which is facing the Cisco-L2-1 switch.
First of all, let’s jump into the port configuration mode.
A:Nokia-VSR# configure port 1/1/1It’s a good practice setting an interface description.
A:Nokia-VSR>config>port# description "Cisco-L2-1"Now we’re moving to the ethernet mode configuration. To support the dot1q encapsulation type, which is used on the link between the Cisco-L2-1 switch and Nokia-VSR, we need to set an ethernet mode to access. By default, ethernet mode is set to the network type.
*A:Nokia-VSR>config>port# ethernet mode access
*A:Nokia-VSR>config>port# ethernet encap-type dot1q
In this case, the hybrid ethernet mode would work also, but it’s better to configure access mode when using port only for services. One of the differences between access and hybrid modes is in the allocation of resources in port queues. For larger networks, such optimization can have a real impact.
Now, we want to make sure to enable the configured port. The command is the same across Cisco and Nokia equipment.
*A:Nokia-VSR>config>port# no shutdownHere’s the complete configuration of port 1/1/1
    port 1/1/1
        description "Cisco-L2-1"
        ethernet
            mode access
            encap-type dot1q
        exit
        no shutdown
    exit
Now, we can move to the second interface, 1/1/2. The configuration will be similar, except for the ethernet section. The Workstation-3 is not aware of VLAN’s, so it expects to receive untagged packets. That’s why we’re not setting an encapsulation here. To configure the access port, we need to set an ethernet mode to access.
*A:Nokia-VSR>config>port# ethernet mode accessDown below you can find the complete configuration of the port 1/1/2.
    port 1/1/2
        description "Workstation-3"
        ethernet
            mode access
        exit
        no shutdown
    exit
Service configuration
To provide layer 2 connectivity between port 1/1/1 and 1/1/2, we need to configure VPLS service. VPLS stands for Virtual Private Lan Service. We will use it to bridge both ports.
First of all, we have to create a VPLS service.
*A:Nokia-VSR# configure service vpls 10 customer 1 createAfter entering this command, we’re placed in the VPLS service configuration mode. During the creation of a new service, you can choose custom service id, valid range is from 1 to 2147483647. In this case id 10 will be chosen, because it’s easier for an administrator to associate VLAN 10 to id 10.
As in the port configuration section, we will set a description so another administrator will know, that this VPLS is used to bridge hosts that are in VLAN 10.
*A:Nokia-VSR>config>service>vpls$ description "Vlan 10"Now it’s time to configure ports, that will be associated with this VPLS. To accomplish this, we have to configure SAPs. SAP stands for Service Access Point. In this case, our service access points will be:
- VLAN 10 on port 1/1/1
- Port 1/1/2
We will start by configuring SAP for port 1/1/1.
*A:Nokia-VSR>config>service>vpls$ sap 1/1/1:10 createAfter sap word you have to specify a port, in this case, it’s 1/1/1. If the port that you’re about to configure is a trunk, after the colon, you have to specify which VLAN will be associated with that SAP. In this example, we want to take only traffic from VLAN 10. Create at the end of the command is necessary if you’re creating SAP. After successfully creating the SAP, you will be redirected to the SAP configuration level. There is no need to configure anything more within SAP configuration because newly created SAP is enabled by default.
The next step is to configure another SAP, this time for the Workstation-3. This time, however, SAP will be configured for an access port. In this case, we don’t have to specify any VLAN after the port number.
*A:Nokia-VSR>config>service>vpls$ sap 1/1/2 createAnd that’s all! Down below you can find a complete configuration of the VPLS.
        vpls 10 customer 1 create
            description "Vlan 10"
            allow-ip-int-bind
            exit
            stp
                shutdown
            exit
            sap 1/1/1:10 create
            exit
            sap 1/1/2 create
            exit
            no shutdown
        exit
Spanning-tree configuration will be covered in another article.
Connectivity tests
After applying the VPLS configuration, let’s check if it’s actually working. First, let’s issue a ping command from Workstation-1 to Workstation-2. From the screen below we can assume, that everything is working as expected.

Now it’s time to test connectivity between Workstation-1 and Workstation-3. Again, we have a valid response.

Troubleshooting
Configuring VPLS’es, SAP’s for the first time can cause headaches, especially when you’re not familiar with TiMOS but don’t worry, you will get used to it, just remember the basic troubleshooting commands listed below.
Checking port status
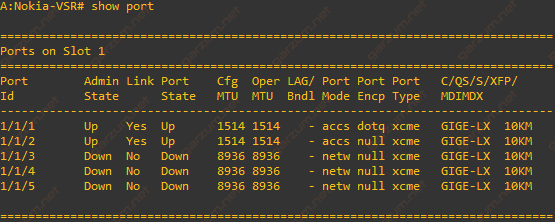
To display physical port status, you can use show port command. It’s similar to the Cisco show interface status. Issuing both commands you can find information such as interface number, operational status, port mode, port type.
Checking service status
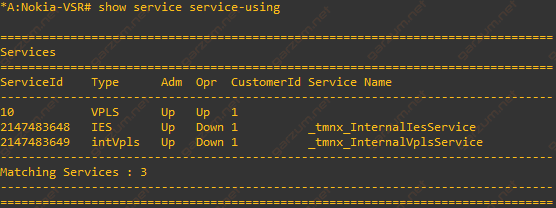
By issuing show service service-using you can check if configured service is in the up/up state.
Checking SAP status
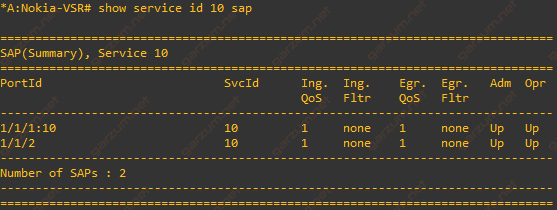
Besides checking if VPLS is in the up/up state, you can check the status of each SAP separately. Keep in mind, that to make everything work as expected, both VPLS and every SAP have to be in the up/up state. You can check SAP status by entering show service id 10 sap. In this case, after an id there is an id of VPLS created earlier in this article. If you have created VPLS with another id, remember to put the correct service id in this command.
Checking MAC entries
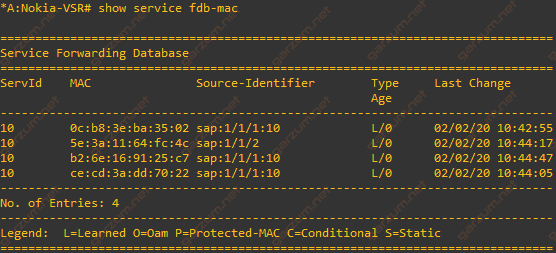
On the TiMOS system, there is no mac-address-table as in Cisco IOS, but you can display mac entries by issuing show service fdb-mac command. In the output, you can find a bunch of useful information such as service id, mac address, source SAP, and last change.
Summary
Nokia equipment configuration approach to layer 2 connectivity is significantly different than Cisco. As you can notice from the shown configuration, on the TiMOS you have to spend more time to configure simple connection because, except for physical port configuration, there is a service configuration needed also. However, this approach gives you more flexibility and possibility, more on that in future articles.

Hi mate,
Would you be able to show me a quick guide on how to configure STP on Nokia to Cisco switch?
Hi. Take a look at this article: https://garzum.net/mst-configuration-on-nokia-7750-and-cisco-ios/
Hi Radoslaw,
Thanks for this blog, For my infrastructure there is cisco switch and Nokia 7750 SR in site A and one more cisco switch and Nokia 7750 SR in Site B. Nokia router in site A is connected with Nokia router in Site B, so what config will I have to put so as there is a connectivity between two switches on both sites
Hi! If you want to have L2 connectivity between both switches, you have to configure trunks on them with desired VLANs on both interfaces facing Nokia routers. On the 7750 routers you have to create VPLS service per VLAN and configure SAP with DOT1Q tagging on each interface facing Cisco switch and other 7750 router. You can refeer to the configuration from this article, interface on Nokia-VSR facing Cisco-L2-1 switch is configured that way.